Being a "bride" is a funny thing. It kind of takes over your life. As my adorable and slightly snarky fiance would say, "Planning a wedding is like launching a small business." And it's true. There are so many details, so many roadblocks in the process....don't get me started on my issues with the bridesmaid dress industry....I've started kind of fantasizing about being a normal person again. As much as I love weddings, and as much fun as this whole process is, it's so all-encompassing that I need to actively decide put all the invitation suites and fabric samples aside and take a breath or two while engaging in non-wedding activities. One of these activities is...blogging! About non-wedding things! So here we go, some of my latest fave things:
Anthropologie Femme Trench Jacket
This adorable jacket was my last hurrah with my mom's employee discount (she worked part-time for Anthropologie until recently). It is so cute, fits so well, and has been helping me put up with the teasing spring weather in NYC (80 degrees one day and 40 the next?? Really??). It has a mix of girly romance and military polish that I really love, and the shiny buttons and gleaming gold hardware just make me happy.
Lyon NYC
Neil and I went here for our 5 year anniversary back in March and I was blown away. The location of this restaurant is super convenient for us as it's right on the border of Chelsea and the West Village, and it has to be the most charming restaurant I've visited in a long time. It's this perfect mix of Southern hospitality and French fanciness...you just can't be unhappy when you're here, with the warm lighting and the waitstaff all dressed in gingham shirts. Neil and I had rose champagne, a warm cheese spread to put on crostini, a frisee and poached egg salad with warm bacon vinaigrette, and a side dish of Jerusalem artichokes sauteed with mushrooms. And for dessert, some kind of crazy bread pudding that was pretty awesome. Lyon is a great spot...I'm dying to go back!
Charleston
So I was recently reading Rachael Ray's magazine (don't judge, I like magazines about cooking) and there was this amazing article about the "new Charleston" and all of its foodie goodness. I am dying to go. I've been once before but was only passing through on my way to a wedding, and I really want a full long weekend to explore all of these new restaurants, eat oysters by the water, and visit the Firefly Distillery (Arnold Palmers with sweet tea vodka?? Yes). Neil and I have always had a soft spot for all things Southern, so a trip to Charleston would be special in many ways. I'm thinking that it'll be one of our first trips as a married couple, either in the fall or the spring. If you have any suggestions for places to eat or things to see in the area, let me know...
Espadrilles
Espadrilles are fabulous. Is there any more delightfully springy, retro-European-y shoe? Nope. They're great because they're classic and trendy and girly and cool. I've always loved these playful, cushion-y wedges, and I think I may start a collection. Here are my most recent acquisitions:
These guys are from Old Navy, and I got them for only 3 bucks because I had store credit from a bathing suit I was returning. I love these because my other two pairs are all colorful and ribbon-y, and these are the opposite: sleek and simple and a very modern take on the classic espadrille. They have a decent wedge at 3", but considering that every other shoe seems to be at least 5" tall these days, I'll take them. These are another pair I almost purchased:
These are adorbs and really comfortable...the kind of shoe that you could put on with a pair of random baggy shorts and a white tank and still look summery-fabulous. I held back because I was worried that maybe I wouldn't wear them very often, but considering how cushy and walkable they are, I would probably get decent use out of them. Damn, Old Navy. When you get it right, you get it right....and I can't resist your delightfully cheap prices.
Windowsill Herb Box
Alert: I need to find a way to grow an herb garden in my and Neil's tiny apartment. I worry that if I grow them inside they won't get enough sunlight, and if I grow them outside the NYC summer heat and humidity might destroy them. If anyone can get all Real Simple on me and tell me how I can grow basil, rosemary, mint etc. successfully, let me know!
Maxi Dresses
I bought into the maxi trend about five years ago when I bought an ankle-length white skirt (which I promptly got rid of after the season), but lo and behold, the trend is way back. I worry about very long items on my frame because I'm afraid that I'll just look like a "wall" of tweed coat or of floral-patterned dress, but I think this is something I need to get over. Since the trend technically came back last summer, there are a multitude of options to pick from this year. I'm thinking that I want one that's kind of playful, printed and bohemian-y, such as this one from Forever21:
I like this print because it's springy and playful but isn't insanely hippie-tastic. If I actually had money to spend (which I don't), I would go for this lovely dress by Banana Republic:
This dress captures the essence of the maxi dress: summery, easy and pretty. On the other end of the spectrum, a neutral maxi can look really chic, like these from Old Navy:
Both of these dresses are inexpensive and really versatile. You could wear them over a bathing suit but also dress them up with bright gold or colorful jewelry for a casual night out. And finally, there's this baby, which is the ultimate in gorgeousness:
Sorry for the poor picture quality, but this silk Alicia maxi dress from J.Crew is the ultimate in full-length casual glamour. If only I had a spare 800 bucks lying around...this would be mine. Go check it out on the site from all angles...it is amazing.
Emma's Ale House
I'm finally going to this awesome Westchester restaurant with Neil and friends tonight...I can't wait! I've only been here once before but of course I'm partial to it because of the name...and seriously, check out their menu! Chicken pot pie, fish and chips, sliders....it's going to be amazing. Comfort food is always fabulous.
So this concludes my spring obsessions post. Next up, spring beauty faves...
When in Doubt, Go Austen.
Life, love, nesting and other lovely mysteries.
Saturday, April 16, 2011
Thursday, December 9, 2010
Wedding Planning, Oh my!
Well here we are...I'm officially in the midst of wedding planning. As much as I thought that I was prepared for the process of wedding planning (I'm definitely one of those girls that's been buying wedding magazines since I could walk into the store and hand over my tooth fairy money), it has been a pretty overwhelming roller coaster ride so far. It's like that True Hollywood Story slogan (or was it from MTV?)..."You think you know...but you have no idea." I really thought I had it all figured out and that I knew what the wedding planning process would entail. I had ideas for a color palette, knew what I wanted my dress to look like, had visions of a homemade-looking wedding cake and simply chic invitations. I knew that it would be stressful, but I felt that at least I had done my homework and knew what the general process would entail.
Fast forward to October of this year...I'm finally engaged....reading the issue of The Knot that's specifically for the NYC area (my first bridal magazine purchased as an engaged lady!)...and I am losing it. "What?! What do you mean we have to register? Omg...we have to apply for a marriage license??" I realized that I had put a lot of thought into the fun, aesthetic aspects of wedding planning like the dress and the centerpieces, yet I was thoroughly unprepared for all of the nitty-gritty aspects of planning this huge and complicated event. This process is so much bigger and crazier than I ever imagined, and there have been many surprises on the way. What's amazing about weddings is that everyone has an opinion, and everyone thinks it should be relatively easy to put together a pretty, personal, inexpensive wedding. It isn't. Especially in my area, where everything is marked up 400 percent just because. Also, it's the holidays, so it's planning upon planning upon planning. And you should know something about me...I both love and loathe planning. So you can see how I kind of feel like I'm on a state of psychological and emotional overload, ready to burst at any given moment.
I imagine that the process of wedding planning is a completely different animal in the age of the internet. There are countless, and I mean countless blogs and websites dedicated to wedding planning and inspiration. This is both good and bad. Two websites that have been undeniably helpful for me are weddingbee.com and weddingwire.com. Weddingbee is a site that I came across while I was in the pre-engagement stage...they have a board called simply "Waiting" where waiting "bees" as they call themselves can discuss, complain and offer support to other waiting bees as they deal with that MIA ring. As much as you may raise an eyebrow to someone looking for support in an "online community," this board was really helpful to me. The vast majority of my friends were not in the realm of seriously waiting on a ring, so it was nice to know that I wasn't crazy - the waiting period is a really stressful, emotional time, especially for us ladies who like to plan (see above). Now that I'm actually engaged, I turn to this site both for the bloggers, who are a diverse group of women who document their planning experiences, and for the members who discuss all of the random issues one comes across in this crazy process. At Weddingbee, you can type in the most random problems, from what ladies thought about the alterations department at a certain bridal salon in your area, to how other brides managed their ever-growing guest lists and budgets. The topics of guest lists and budgets bring me to weddingwire.com, which is super-helpful for when you're really in the midst of planning. It is free, so you just sign up and can manage your budget, guest list, planning checklist, wedding website...it's amazing, and I would highly recommend it.
Other websites that I enjoy are Oncewed.com, Ruffledblog.com, and Stylemepretty.com....but you must observe these sites with caution. They are full of "real weddings" that are great for inspiring your creativity and overall vision for your wedding. This wedding was recently on Ruffled and was just beautiful:
(http://ruffledblog.com/vintage-southern-wedding/)
And then there was this wedding, whose flowers I will definitely be showing my florist for inspiration:
(http://ruffledblog.com/raspberry-pink-romantic-wedding/?pid=506&pageid=27069#ngg-imagebrowser-pic)
Amidst all the pretty, however, there is a dark side to all of the "wedding porn," as these blogs have crassly been called. Some of these weddings will just make you feel like an inferior, completely uncreative and unoriginal person. Take this wedding:
(http://www.oncewed.com/36091/wedding-blog/real-weddings/handmade-georgia-farm-wedding/)
The bride is French (and happens to look like Zooey Deschanel). The groom is Southern. The bride's mother MADE her wedding dress...and the covers for the hay bales...and the table runners. A friend made the boutonnieres. Yet another friend did the catering. They just did away with having a bridal party. And while their wedding was damn beautiful, it also made me angry. While I have a decent amount of hookups (my mom's friend is a florist/event planner, a friend bakes cakes professionally, my fiance is part owner of a wedding photography company)...nothing comes free. And I (nor my fiance) wouldn't really want it that way. Yes it's my wedding day, but I'm not comfortable imposing on people (even my mother) to the point where they are laboring for free. And I'm not a French Zooey Deschanel look-alike. I just can't compete!
Here is the ultimate inferiority-complex inducing wedding. This bride put together her pretty (and very color-coordinated) wedding for 10,000. Mind you, it was in Tenessee, which gives her an unfair advantage...but still.
(http://www.projectwedding.com/wedding-ideas/the-budget-savvy-bride-from-tennessee)
The thing with this bride (and many of these DIY-chic brides) is that she is a graphic designer. So not only did she design all of her stationery, programs, signs...even the wine bottle labels and the utensil wrappers...she also traded her graphic design services for a 2,000 dollar photography package. Yeah. I kind of hate her. I mean, I'm in awe of her but also....jeez. Why did I not take graphic design classes in college? Why do I not have innate floral-arranging abilities? Why oh WHY does my mom not sew? It's enough to drive a bride nuts.
My solution to all of this is to try to prioritize. It's all about figuring out what's important and what's not, and saving your creative energy for those things that really get you excited. There are so many expectations as far as etiquette, traditions and pomp and circumstance when it comes to weddings. Ironically, the "DIY-vintage-shabby-chic-wedding-on-a-budget" weddings that have emerged as a rebellion to the etiquette, traditions and pomp and circumstance are just as daunting to your average bride (aka me) as the crazy "platinum weddings" of yore. You just have to trust that your day will be beautiful and romantic and personal, even if the utensil wrappers don't match the programs. Just don't tell the Budget-Savvy Bride From Tennessee :).
Tuesday, November 16, 2010
Smoky Eyes Two Ways
Hey everybody! Man it is hard to keep up with blogging amidst the wedding planning...I'm realizing that I need to declare a couple days a week "wedding-free" days for my own sanity and for the sake of this blog. Instead of reading reviews of yet another reception venue location, I'm going to spend my mental energy on one of my favorite pre-engagement topics: makeup!! I've been wanting to discuss eye makeup for awhile because I've found that amongst my girlfriends, a lot of them shy away from trying smoky eyes, thinking that they'd be too complicated or make them look crazy. Au contraire! Eye makeup is so fun because there are so many looks to try and it really is foolproof as long as you apply a little at a time and slowly build the look. It's kind of like painting. Today I'm going to outline two different ways to do the smoky eye: daytime and nighttime.
The Daytime Smoky Eye
As seen on Julia Roberts (picture from glamour.com/beauty)
So I know that eye makeup sounds like a lot to deal with on a daily basis, but it can have major prettiness payoff, and you can customize your routine depending on how much time you have in the morning. Here we go:
Step 1: Concealer. Every good eye makeup look starts with a good concealer underneath the eye and in the inner corners. Two concealers I love are:
CoverGirl and Olay Simply Ageless concealer
Fresh Supernova Radiance Brightening Pen
These two concealers are the bomb. I always use the CoverGirl in the morning (sometimes with some of the Fresh on top if I'm really tired), and the Fresh is great to apply later in the day if you're getting ready to go out.
2. Brows
Brows are so, so important for any eye look. If you keep your brows shaped and groomed (but not overly thin), you're well on your way to looking polished. I brush mine up and out and add a little taupe eyeshadow with an eyeshadow brush to darken and define them a tad. Tweezing happens once a week or so.
3. Eyeshadow
When I started actually wearing eyeshadow (which I really didn't until college), CoverGirl eyeshadow quads really saved me. In my opinion, these quads are the best for creating natural-yet-noticeable daytime eye makeup looks. Applying is this simple: apply the lightest shade as a highlight under your eyebrows and in the inner corner of your eyes, apply the medium shades to the lids (I usually apply a little of both of the medium shades) and then apply a little of the darkest shade to the outer third of your eye and blend it a little bit into the crease. The CoverGirl shadows are sheer enough that you don't worry about it being too much.
4. Eyeliner
Next I use a pencil eyeliner and smudge/dot it along my upper lashline. As I wrote in a previous blog entry, I've been really liking Revlon Colorstay eyeliner in Black/Brown. Once I have the eyeliner along my upper lashline, I use a spongy blender brush that came with my makeup brush set (it's pretty similar to those spongy applicators that come with eyeshadows), and smudge the eyeliner so it's soft and a little smoky with no hard edges. I then use the bit of eyeliner that's on the smudger to add a little color to the bottom lashline, only on the outer half of the eye. When in doubt, smudge/blend with your fingers.
5. Eyelash Curler/Mascara
Easy! I love CoverGirl VolumeExact for everyday - a couple coats on top lashes and one light one on bottom.
The Nighttime Smoky Eye
Kate Beckinsale...does she ever not look gorgeous??
1. So the great thing about nighttime smoky eyes is that you can just add products on top of whatever you're wearing. If you didn't already have some daytime eye makeup on, apply concealer as you would normally.
2. Eye shadow. This is the key to demystifying the smoky eye, I think. As a rule: do not start out with black eyeshadow, or even gray. These colors are difficult to pull off and require a skilled hand. I would do color: bronzes and shades of purple/plum are my personal faves, but if you have brown eyes, do the Beckinsale and try green! Navy can also be really flattering. When applying, just use a little at a time. Cover the lid, maybe go into the crease a little...just do as much or as little as you're comfortable with. Step back every moment or so and look at your work from a little farther away. If you have a small, travel-size blush brush, you can use it to lightly blend/diffuse any hard edges outward so there are no weird smudges or lines. If you are using an eyeshadow duo or palette, use a medium shade over the crease and use the darker shade (or a tiny bit of black eyeshadow if you feel comfortable) to shade the outer corner and crease.
3. Get a little bit of eyeshadow, either the medium shade or the darker shade depending on what you prefer, onto an angle brush and apply to your lower lashline. Blend a little with your finger if needed.
4. Line your upper lid with black eyeliner - either a pencil or liquid, whichever you prefer. I like Almay black eyeliner and NYC liquid eyeliner (it has the best, tiny little brush that makes it really easy to build a smooth line).
5. Curl lashes, apply lots of mascara. For nighttime, I love to layer L'Oreal Collagen Volume mascara over my CoverGirl VolumeExact to the top lashes only - it gives the look of false lashes without that extra effort.
Done! Just try it...you will look gorgeous.
Thursday, October 28, 2010
Well I'm Engaged...So There's That.
(!!!!!!!)
So I have totally, inexcusably neglected this blog lately...it feels like it's only been a couple weeks, but in reality it's been almost a month since I posted. I am sorry. No really, I am. I love this blog and I am really proud of it and I really hate that I haven't been posted. Buuutttt.....
I'm engaged!!!
So there's my excuse, despite the whole "inexcusable" thing. It happened last Tuesday (October 19th!), and between that and the 5 thousand million auditions I've been going on, my computer time has been really limited. But here I am, feeling (as Jane says in Pride and Prejudice when Bingley finally pops the question) like "the most fortunate creature that ever existed." I'll spare you all the corny details of how I (impatiently) waited for months for the proposal, and how he ever-so-casually proposed on the Highline Park in Chelsea and how I somehow could not spit out the word "Yes" for about a good five minutes...anyway. It has happened, and now that it's really settled in, and the phone calls have been made, and the shock of calling him "my fiance" has worn off, I look at my hand and just feel pure joy, and excitement for what is to come.
Despite the horror and dismay I came across recently in realizing how crazy expensive it can be to throw a wedding in my neck of the woods, man I am loving wedding planning! I've been calling a few venues trying to find the right place, and I am telling you, there is no sweeter question to hear than "Are you the bride?" Every time I am asked, I can't resist almost squealing "YES!" I also think, every time I give my name to one of the planners, that my last name will be different very soon. I am just delighted. I was kind of born to be a bride-to-be, as ridiculous as it sounds. I am just hoping that the small breakdown I had on Monday night (well, if you ask my fiance, maybe it wasn't so small) will be the only one and that I will somehow be able to enjoy the process without getting overwhelmed or having unrealistic expectations. Thankfully I have wonderful friends (and sisters-in-law-to-be!), not to mention my family and fiance, that I know will lovingly but firmly keep my head on straight - without these people, I would be a puddle of nerves and emotion, pretty much all day every day. Thank you to everyone who has stuck by me during the "waiting" period to see me come out the other side as a proudly engaged woman....I could not be more grateful for both your support and your tough love.
So there we go. I vow to you and to myself that I will not neglect Go Austen anymore, and I really appreciate everyone reading. Onward to more ramblings (including some tidbits of wedding planning, hazah!).
P.S. Remember those fabulous hardcover classic books from Anthropologie that I featured recently? Well guess what I got Neil as an engagement present...
hey I can try to be as patient as Penelope right?
P.P.S. Thank you Cecilia for your super-sweet compliment! I will try not to let you and your sister down. :)
Tuesday, October 5, 2010
That's So Austen.
Things right now that have stood out to me as very Austen lately, as fall has finally descended on the Northeast:
If you know me, you know I'm OBSESSED with Anthropologie. Most of my wardrobe is either from this store or looks like it's from this store (and is actually from Target, Forever21 or Kohls...gotta love some bargains). I swear that if Austen heroines were living today, they would be dressed head to toe in clothing from this ladylike, smart, classic-with-a-twist store. Last night I was sitting in an Anthropologie on a leather couch and it just came to me...the English undertones...the cheeky wit...the weathered, countryside-ish wood...it's just SO Austen. AND...!!
Anthropologie
If you know me, you know I'm OBSESSED with Anthropologie. Most of my wardrobe is either from this store or looks like it's from this store (and is actually from Target, Forever21 or Kohls...gotta love some bargains). I swear that if Austen heroines were living today, they would be dressed head to toe in clothing from this ladylike, smart, classic-with-a-twist store. Last night I was sitting in an Anthropologie on a leather couch and it just came to me...the English undertones...the cheeky wit...the weathered, countryside-ish wood...it's just SO Austen. AND...!!
OMG the books!! They are now carrying these beautiful, antique-looking hardcover versions of some my absolute favorite books: Pride and Prejudice, Emma, The Odyssey and many more. I cannot deal. I want them all. But of course, at 20 bucks a pop, I can't just buy them all. SO where do I start?? I'm tempted to get Pride and Prejudice (just finished my re-read of it last night! Damn it is SO good. Elizabeth to Darcy: "To be sure, you knew no actual good of me--but nobody thinks of that when they fall in love."), as my copy is literally falling apart. But I want Emma! Can I even choose between Pride and Prejudice, which I love so much, and Emma, which I also love to the point that it is my future daughter's namesake? And then I also want Sense and Sensibility, so I can read it next! But I also need the Odyssey, aka my favorite love story ever! Oh Anthropologie, the endless dilemmas you create in my mind...
English Countryside Beauty
This picture is from an entry in the Beauty Department blog at luckymag.com. I just think this girl is beautiful, and she reminds me of a combination of Elizabeth and Jane in the most recent Pride and Prejudice movie. The big eyes, defined brows, delicate flush of the lips and cheeks...ever notice how in Austen novels (and other works from the time) they're always mentioning people's "colouring" in conjunction with their emotions? I.e. "But Jane, you are so pale" and "Elizabeth had a healthy colour in her cheeks after her exercise in the country"? And eyes are also important...there's a whole part of Pride and Prejudice where Darcy is made fun of for stating that Elizabeth has "fine eyes." So I'm loving this soft and gentle makeup...some shades to try to get this particular shade of flush would be Nars the Multiple in Maui, Nars lipstick in Dolce Vita, or Stila Convertible Color in Lillium...try it out girls! Perfect for fall.
The Lace-Up Bootie
Now I don't pretend to know what kind of shoes Austen ladies would have actually worn, but I imagine that they would have worn something at least in this genre and that they would have approved that they're now one of the biggest shoe trends out there. I got myself a pair of grey leather ones that are a little low-cut in the front and have a medium-height heel, and I can't wait to wear them now that it's finally cold enough to stop wearing sandals! They're so cute and versatile and I feel like there's a lace-up bootie for everyone out there right now, you just have to search a little bit! Stay tuned for a post on how I actually dress around these babies...a challenge that I am ready for.
That is all, happy Tuesday! Embrace your inner English Country Rose...you know you want to.
Friday, September 24, 2010
Skincare
Happy Friday ladies (and gents)! Today I'm going to talk about that very complicated topic of skincare. I don't know about you, but sometimes I get so overwhelmed at the drugstore, just staring at all the skincare products wondering which items work the best and if this cleanser would go well with this moisturizer, etc. Here are some of my favorite skincare products (and I promise I've tried a LOT):
Cleansers
Cleansers
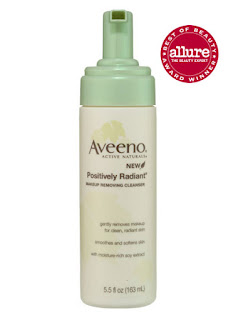
Aveeno Positively Radiant Makeup Remover Cleanser
I found this at Target and I really, really like it. Like all Aveeno products, it has a pleasant, light scent, is gentle and moisturizing and doesn't irritate your skin. What I love about this specific cleanser is that it is self-foaming and it creates this awesome lather that feels so good on your skin - you feel like you're getting a spa treatment every night! It is very gentle so sometimes I have to lather up twice for it to really get everything off my face, but for me I'd rather use a more gentle cleanser and have to use it twice than use something harsh on my skin.
Philosophy Purity Made Simple Cleanser
This is a product I've used off and on for years. Like the Aveeno, it's really gentle and will never sting your eyes, but it's a very effective cleanser and I love the smell - kind of a weird smell to try to describe, but it just smells like a spa! Almost lavender or rosemary-ish. It is definitely more expensive than the Aveeno, but it's just so effective and pleasant to use that I always end up going back to it.
Moisturizers
Neturogena Oil-Free Moisture SPF 15
Mine has newer packaging, but looks similar to this. For a day moisturizer, I usually go as plain as possible - something oil-free that won't make me greasy but will moisturize and protect my skin. This stuff is really good.
Burt's Bees Positively Ageless Night Cream
This is my nighttime moisturizer, and I really like it. Just moisturizing enough, with a nice light texture - plus a great pomegranate scent that to me smells like cranberry tea or something. It's really good, and it's all-natural which is a nice plus. I'm going to have to get more!
Eye Cream
Origins GinZing Eye Cream
This is such a great eye cream...I use it in the morning after moisturizer, and it really helps "wake up" my eyes. Besides for the ginseng and caffeine to de-puff, there's a nice luminous pink tint that helps camouflage my dark circles, which are probably my biggest beauty gripe. This eye cream plus CoverGirl Simply Ageless concealer equals bright eyes!
So there you have it...some truly great skincare secret weapons. Try them out!
Monday, September 20, 2010
Hair How-To.
This Friday night when I was heading out for dinner/drinks with my girlfriends, I couldn't figure out what to do with my hair. I recently cut bangs for myself, and while I quite enjoy them , they freak out in the humidity and it seemed like it was going to rain that night. So I ended up putting my hair up in this braided hairstyle that I've done a few times that was inspired by these pictures from glamour.com/beauty:
I promise it's really easy and looks great with any hair type/texture, and it's so flattering and girly and cute! My BF always compliments my hair when I wear it this way...and you know for a guy to actually comment on a hairstyle is a big deal. Here is my how-to:
1. The first step is to start with a little texture in your hair. It doesn't really matter if your hair is totally dry or slightly damp, but either way add a little texturizing product (I just used some flexible-hold Aussie hairspray, the shine+hold one) to your hair before you start braiding. Flip your head over, spray it in and massage/scrunch your hair and flip over.
2. Next, divide your hair in half from forehead to neck, as if you were going to do pigtails, and secure one side with an elastic. you don't have to do it right down the middle; I think I look better with a slight side part, so I divided it that way. I think it looks better when it's a pretty messy part, so don't overthink it!
3. Start french-braiding the side you didn't secure. Err on the side of braiding a little more tightly - you can loosen it up later, and it will loosen on its own as you wear it. If you've never french-braided, here's a tutorial:
4. Braid it all the way down to the end and secure with an elastic. Next, braid the other side of your hair.
5. Once you've braided down to the ends, take the elastic out of the first braid and gather your hair together to form a bun. you can un-do some of the braid so it's easier to get into a bun.
6. Secure the bun with an elastic and then with bobby pins if needed/desired. Finally, spray with strong-hold hairspray - I like John Frieda Moisture Barrier.
7. Ta-da!
Try it out and let me know how it goes! The biggest thing with this hairstyle is not to worry about it - it can be as messy/neat/whatever as you like!
Subscribe to:
Posts (Atom)